Installing and Configuring SSH Under Windows
Some friends of mine want to join the Valheim server I set up a while ago, and they asked me to explain to them how to create an SSH key under Windows to control the server (I set up a system where people can start, stop and query the status of the server. More about that here).
Most of the tutorials I found on the internet were quite old (suggesting to RSA with 1024 bits!). So I thought of writing a quick tutorial that uses settings that are a bit more modern. I’ll be describing 2 methods. One with PuTTY, the other one with the built-in BSD OpenSSH client under Windows 10.
Built-in OpenSSH
This is the recommended way of doing things, and it’s not fundamentally different from configuring SSH on *NIX platforms. First, open a PowerShell prompt. In that window, type:
ssh-keygen -t ed25519
-t ed25519 tells OpenSSH to create an
ed25519 key. This is a form of
elliptic curve DSA. It is faster and more secure than RSA keys. I would
recommend this algorithm, although you can also use standard NIST ECDSA.
OpenSSH should start a dialog. If you’ve never created an SSH-Key, you can just hit enter to choose the default path. It’s not important where you save the key, just make sure it’s in a place only your user can access (the default location is fine for that). After you enter the path, it will ask you for a passphrase. It’s recommended to choose a passphrase, although it’s not strictly necessary if you just use the key for this functionality, since it doesn’t really have high stakes. If you plan on using the key for other things, I would recommend choosing a passphrase.
After that, go into the path were it saved the key, and
open the public key file (in my case id_ed25519.pub). Then send the text string
to your sysadmin. He will enter that key in his authorized_keys file.
PuTTY
This is the “old-school” way of doing things. If you’re running Windows 10, I would recommend you use the built-in OpenSSH client.
First you need to download and install PuTTY. After installing it, we first need to generate a key. After that, we’ll create a profile for each command. That means we can just select and open the profile to execute our commands. To generate a key, you need to execute a program called PuTTYgen. The correct options are shown in the following screenshot. We want an ed25519 key, so choose EdDSA under Type of key to generate, and make sure ed25519 is selected as the type.

After that, click generate. Generation should be very fast on a modern computer. After generating you will see the following:
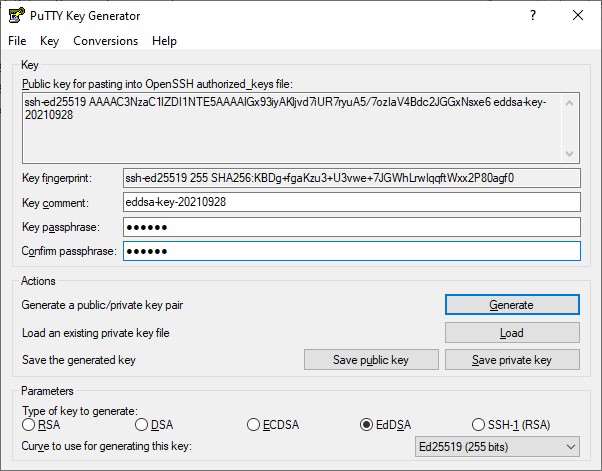
You can just copy the public key out of the box at the top. Send that to your
sysadmin. Afterwards, you can choose a passphrase and klick on save private key. Choose an appropriate location (c:\User\username.ssh is a good place).
You can also save the public key, but that one can also be generated from the
private key later, so you don’t need to do it at this time.
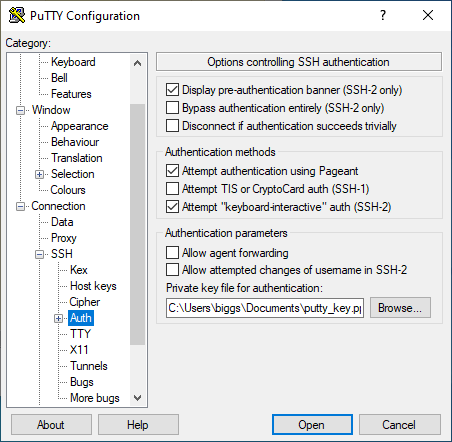
After that, open up PuTTY. Enter the appropriate hostname into the dialog (ask your sysadmin for the correct FQDN). After that, we need to do 2 things. First we need to manually specify the SSH key. For that, go into Connection -> SSH -> Auth. In the last option, we can specify the private key file. Just hit browse, and select the private key.
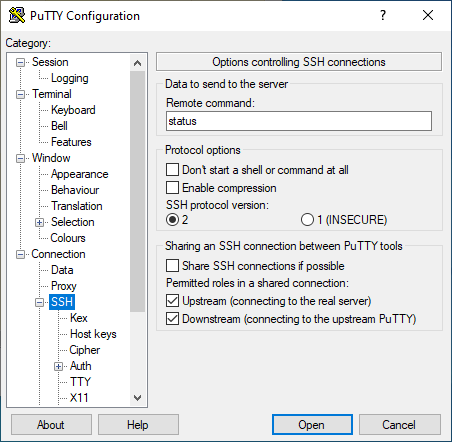
Because PuTTY tries to connect to an interactive SSH immediately (which isn’t allowed for security reasons), we need to configure some additional things. The best way to do this is to create 3 sessions for each of our 3 commands. To associate a command with a specific connection, we go to Connection -> SSH. There we can specify a remote command.
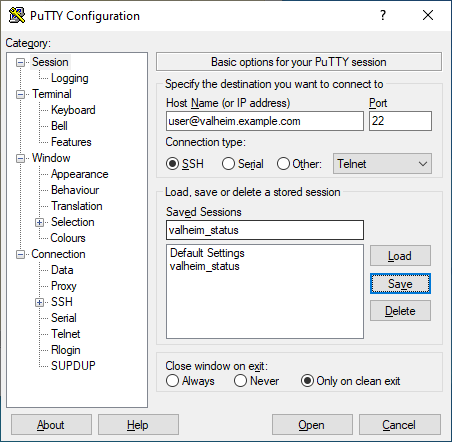
After that, go back to Session and define a session name under Saved Sessions.
After that, save the session.
Repeat the process for the other commands. After that, you can just open putty, load the session and click on Open to execute the command. Now everything should work. Good luck and have fun with Valheim!